

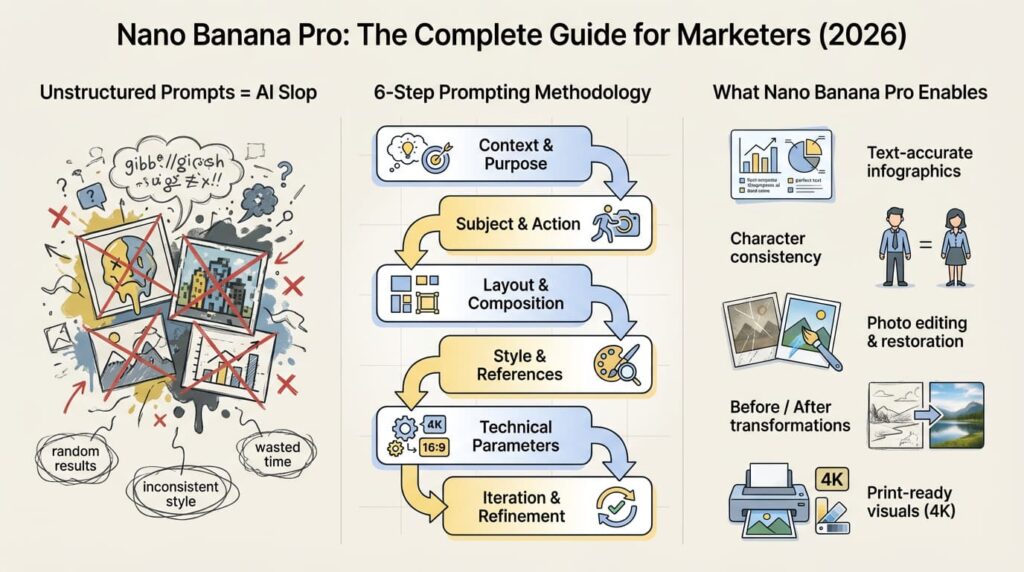
Learn how to use Gemini 3 Pro Image (Nano Banana Pro) for marketing. 6-step prompting methodology, 5 real use cases, ready-to-use templates. Transform your visual content workflow in 2026.
The AI image generation landscape has changed dramatically over the past year. Google DeepMind’s Gemini 3 Pro Image (Nano Banana Pro) has transformed how marketers and designers create visual content.
This guide covers how the model works, a 6-step prompting methodology, 5 real-world marketing use cases, and ready-to-use prompt templates.
⚠️ Note: Updated October 2026. Google now offers several Nano Banana models. This guide covers Nano Banana Pro (Gemini 3 Pro Image), the strongest of them for complex layouts and small text. For everyday images, the newer and faster Nano Banana 2.1 is often enough. Limits and features change often; check official documentation for updates:
How can Nano Banana Pro improve marketing results in 2026?
In this guide, you’ll see how Nano Banana Pro fits into real marketing workflows: from blog visuals and email campaigns to lookbooks and before/after transformations.
Why Nano Banana Pro Actually Feels Different
Most AI image tools work like this: you type a prompt, get a random-looking result, don’t like it, and have to start from scratch. Nano Banana Pro behaves very differently. Instead of “slot machine” generation, you build one image step by step in a conversation, refining details while the model remembers everything you said before.
Think of it as working with a sharp, patient designer who quickly “gets” your taste. You can change colors, layout, objects, or text, and it adjusts the same scene instead of inventing a new one every time.
How It Works Under the Hood
Nano Banana Pro uses a two-stage setup (think: “understand first, then create”):
Stage 1: Analysis
It reads your text, examines references, and understands structure, proportions, and hierarchy.
Stage 2: Generation
It builds the image from that deep understanding instead of “guessing” from keywords.
Google’s lineup has grown since this guide was first published. Here is how the models compare in the Gemini API as of October 2026:
| Model | API name | Best for | API price (approx.) |
|---|---|---|---|
| Nano Banana | gemini-2.5-flash-image | Quick, lightweight edits | Retires no earlier than March 15, 2027 |
| Nano Banana 2 | gemini-3.1-flash-image | Existing workflows | Being replaced by 2.1 |
| Nano Banana 2.1 | gemini-nano-banana-2.1 | Fast everyday images and drafts | ~$0.034 per 1K image, $0.113 per 4K |
| Nano Banana Pro | gemini-3-pro-image | Complex layouts, small text, print | ~$0.134 per 1K/2K image, $0.24 per 4K |
The practical difference: Nano Banana Pro is the model to use when the result has to be right on the first try, such as print, posters with small text, or complex compositions. Nano Banana 2.1 costs about a quarter as much per 1K image in the API, runs faster, and lets you choose how much the model “thinks” before it draws (minimal, medium, or high). For high-volume social content and drafts, start with 2.1 and move to Pro only when 2.1 falls short.
When a Faster Model Is Enough
- ✅ Quick sketches and concepts.
- ✅ Social media posts (1K is enough).
- ✅ Experimenting with ideas.
When You Need a Pro
- ✅ Print materials (need 4K).
- ✅ Posters with text (multilingual support).
- ✅ Image series (character consistency).
- ✅ Professional marketing (photography control).
- ✅ Vertical content (Stories, Reels 9:16 format).
Core Principle: Structure Determines Results
The model can think logically but can’t read minds. It delivers its best only when you formulate a clear task.
❌ Bad prompts:
- “Make it beautiful.”
- “Create a cool poster.”
- “Draw something awesome.”
✅ A good prompt contains:
- Task context
- Structure and composition
- Scene parameters
- Style directions
- Understanding of the end goal
6-Step Prompting Methodology
This methodology is based on official Google recommendations with added practical experience for marketers. Below each step, you’ll see a real example from a children’s emotions infographic prompt, so you can immediately see how the theory translates into practice.
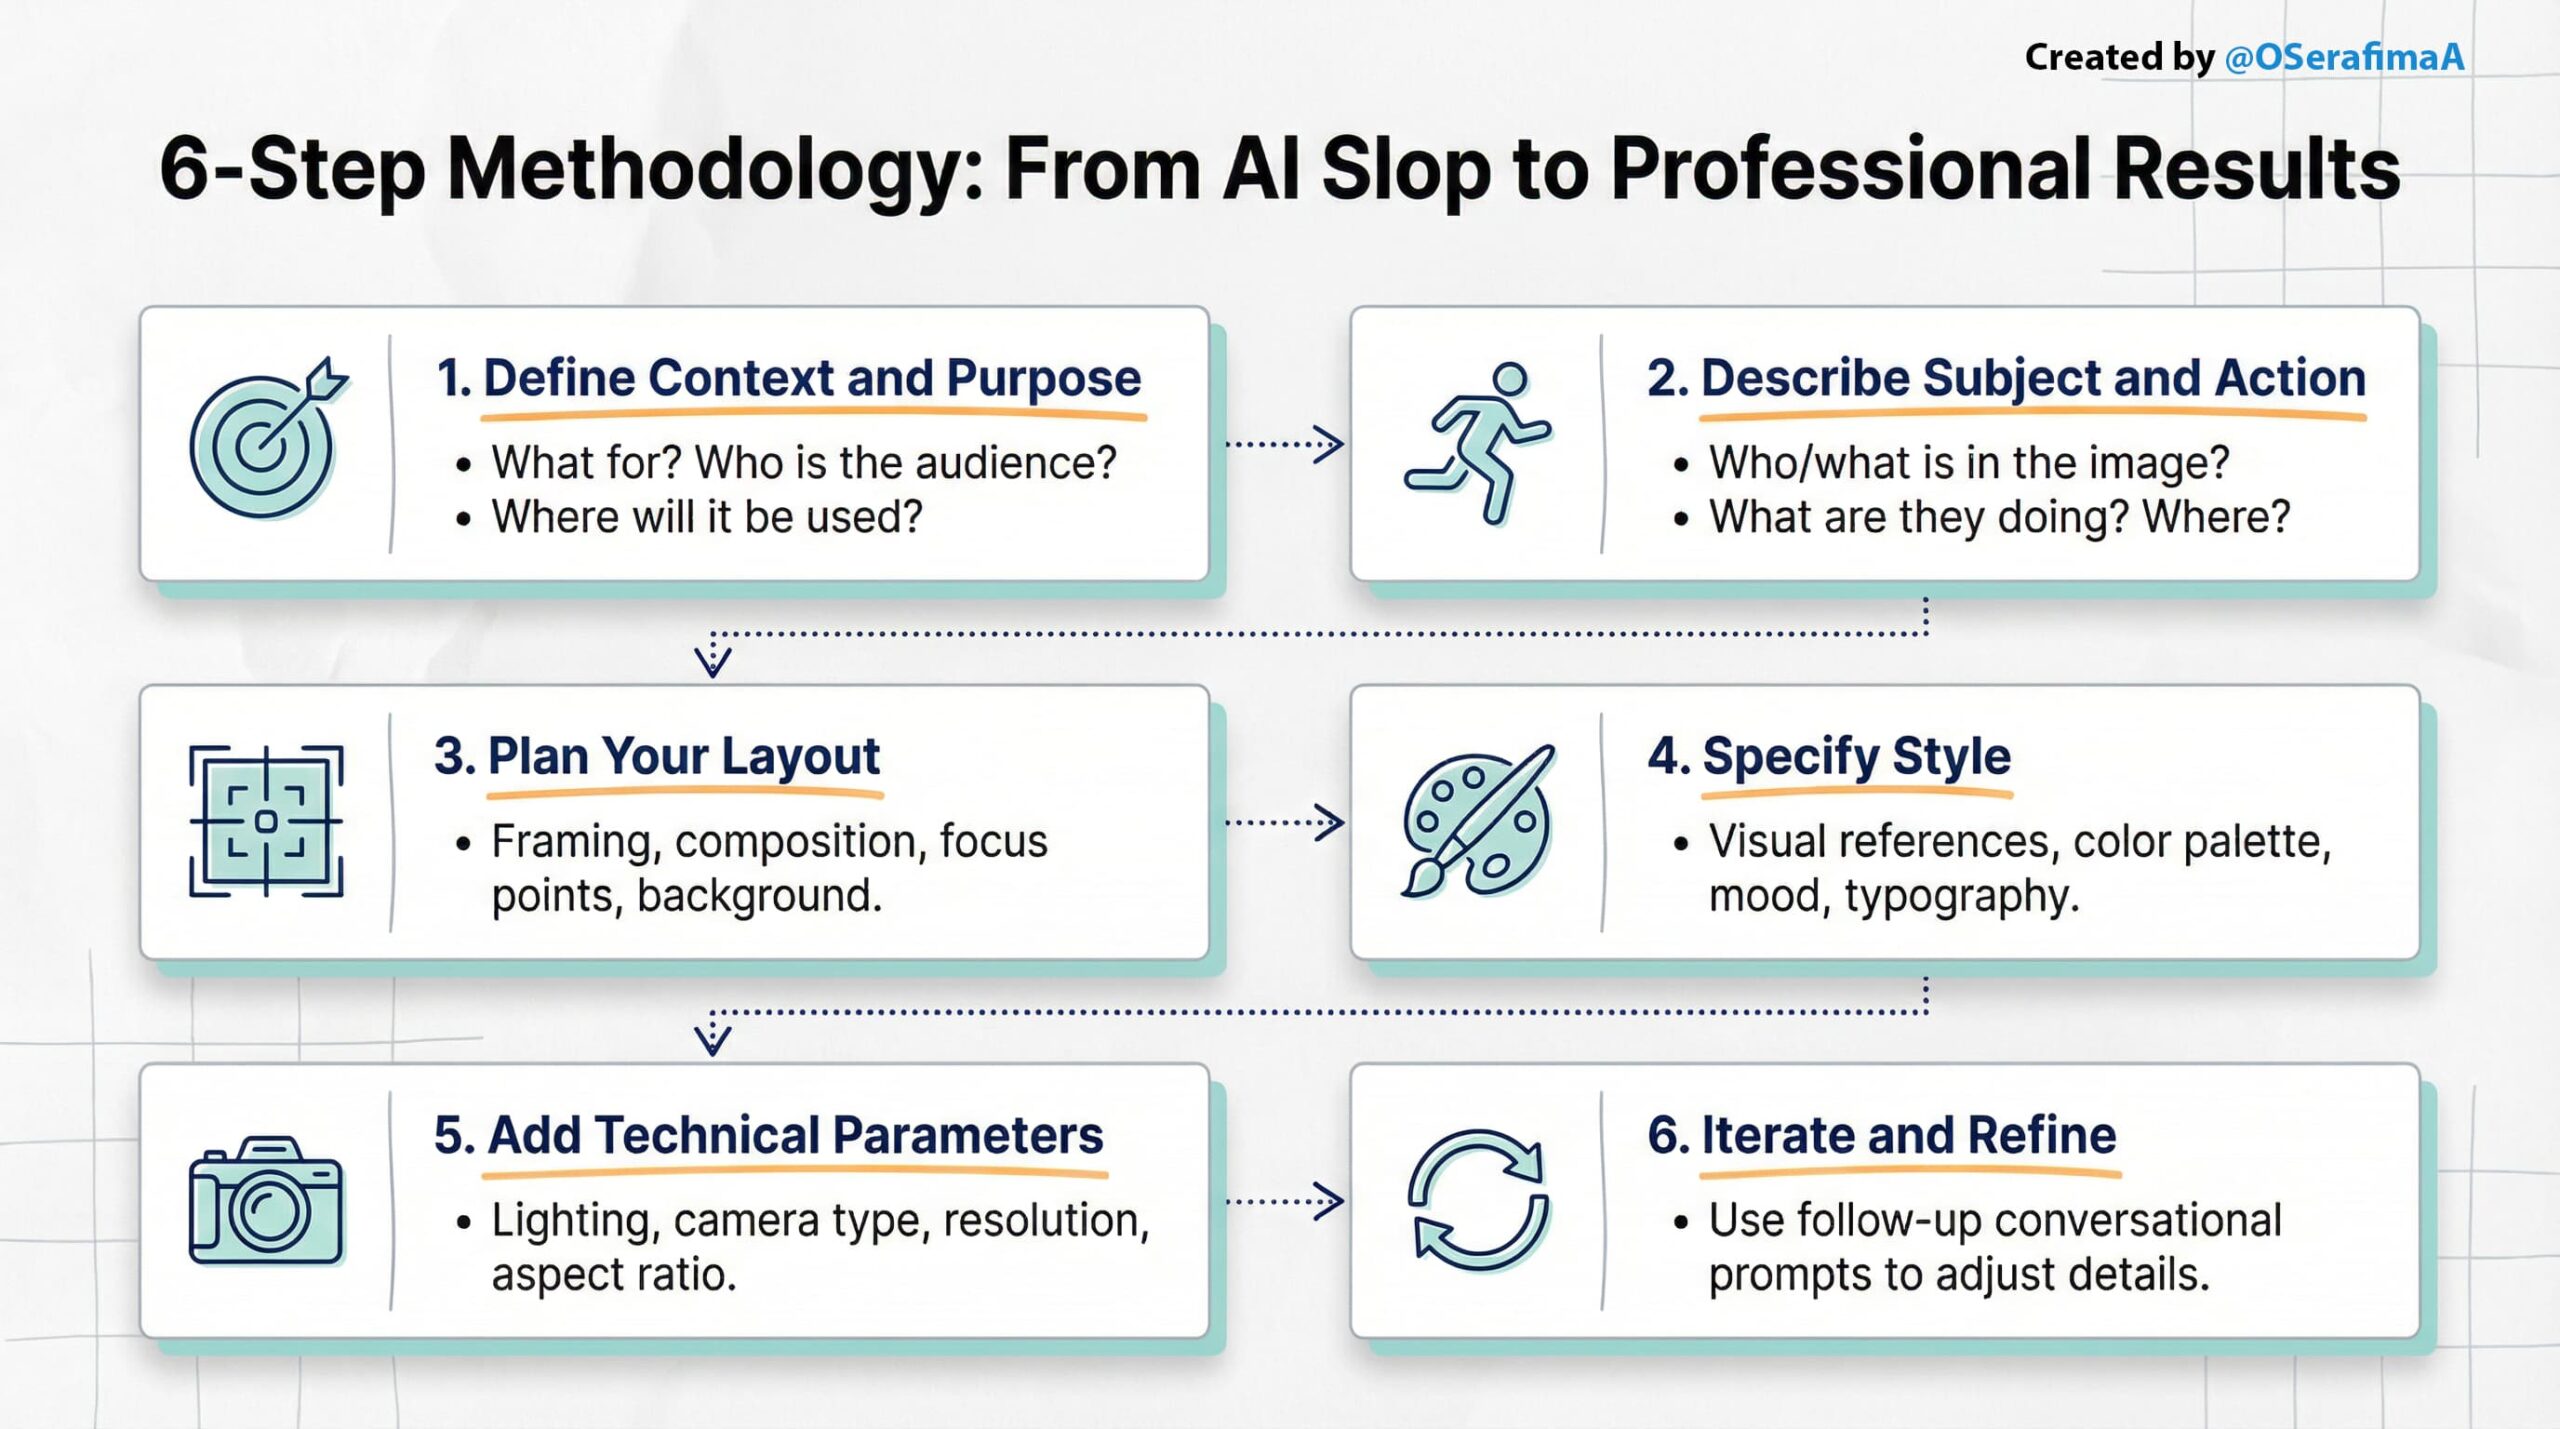
Step 1: Define Context and Purpose
Start by describing:
- What for: this image (ad, poster, infographic, or story)
- Who: target audience (young professionals, corporate clients, B2B)
- Where: it will be used (Instagram, print A2, presentation, email)
❌ Bad: “Create a beautiful poster.”
✅ Good: “Poster for IT conference, A2 format for print, target audience: developers 25–40 years old.”
Why this works: The model immediately understands constraints and optimizes results for the real use case.
Real prompt example:
Before designing, clarify why you’re making this image.
What for? Educational infographic about emotions for kids.
Who? Children aged 5–10 and parents.
Where? Blog articles, presentations, and handouts.
Goal? Help kids recognize and manage basic emotions safely.
That’s it. Now the model understands what “good” looks like and generates accordingly.
Step 2: Describe Subject and Action
Clearly specify:
- Who/what is in the image (subject)
- What they’re doing (action)
- Where they are (location)
❌ Bad: “beautiful landscape.”
✅ Good: “A woman in business attire presenting at a tech conference, standing at a podium with a large screen behind her showing data charts in a modern convention center with glass walls.”
Real prompt example:
Describe the core visual: four emotion blocks with practical tips. Each block pairs a feeling with what kids can do about it.
Visual elements: Stylized diverse kids and friendly animals (bunny, bear, kitten) interacting with the emotion blocks in a cozy, safe environment.
Content:
Title: “Big Feelings: 4 Emotions and What to Do with Them”
Joy 🎉: “When I feel happy!” → Tip: “Share your joy!”
Sadness 😔: “When I feel down.” → Tip: “Talk to someone you love.”
Anger 😠: “When something feels unfair.” → Tip: “Take a deep breath and count to 10.”
Fear 😨: “When I feel scared.” → Tip: “Ask an adult for help.”
Footer: “All feelings are okay!”
Step 3: Plan Your Layout
Tell the model exactly how to arrange everything on the canvas.
Framing: Wide shot so all four emotion blocks fit comfortably.
Layout: Title centered at the top. Four emotion blocks are arranged in a 2×2 grid in the center. Friendly animals are scattered around the blocks. Footer message at the bottom.
Focus: The four emotion blocks are the visual anchor. Animals and kids support them without stealing attention.
Background: Soft, pastel colors (cream, light blue, pale yellow). Generous whitespace to keep it calm and readable.
Specificity here = accuracy in the final image.
Real prompt example:
– Layout: Four large, soft “pillow blocks” arranged in a 2×2 grid on a bright background
– Framing: Wide shot showing all four blocks equally
– Focus: Each emotion block is equally prominent.
– Block structure: Big emoji at the top, friendly title, short description, and tip inside a speech bubble or tag
– Spacing: Plenty of whitespace (ivory/cream background), calm, breathable layout, not cluttered
Step 4: Specify Style
Two ways to set style:
Method 1: References through comparisons
- “Apple Keynote presentation style”
- “Dribble poster aesthetic”
- “MIT educational graphics”
- “Vogue magazine cover”
- “New Yorker cartoon illustration”
- “in the style of [artist/magazine]”
Method 2: Upload reference images and ask AI to describe the style.
Upload 3–5 reference images; the model maintains consistency across up to 14 images. Use the AI description in your final prompt; consistency is guaranteed.
Real prompt example:
REFERENCES:
- Squishmallows / Jellycat plush toy aesthetic
- Visible velour/fleece texture
PALETTE:
- Primary: Soft peach, gentle pink
- Secondary: Mint, lavender
- Background: Ivory/cream
- Accents: Warm yellow
TYPOGRAPHY:
- Rounded, friendly sans-serif fonts
- Perfect readability
TONE & MOOD:
- Warm, supportive, accepting, safe
- Educational through play, not clinical
Step 5: Add Technical Parameters (Camera + Lighting)
- Lighting: natural daylight, studio lighting, dramatic, backlit, golden hour
- Camera: 35mm, 50mm f/1.4, 85mm portrait lens
- Depth of field: shallow (blurred background), deep (everything sharp)
- Aspect ratio: 9:16 (vertical), 16:9 (horizontal), 1:1 (square)
- Resolution: 1K, 2K, 4K (always explicitly write “4K resolution” if needed; otherwise, it may default to 2K)
Example: “Shot with 50mm lens, shallow depth of field, soft natural daylight from the left, warm color tones, 4K resolution, 16:9 aspect ratio.”
Real prompt example:
Lighting: Soft, diffused studio lighting from the front above, gentle shadows for volume, no harsh contrast
- Aspect ratio: 16:9 (horizontal landscape)
- Resolution: 2K (2048 × 1152 pixels)
- Render style: High-quality stylized 3D visualization with emphasis on softness and textures
Step 6: Iterate and Refine
The model preserves context; use follow-up prompts:
- “Make the title larger.”
- “Align text to the left.”
- “Add an orange accent color.”
- “Move the product slightly to the right.”
- “Make the background darker.”
- “Add more whitespace around the logo.”
Pro tip: Iteration is officially recommended by Google. The model gets better with each refinement.
Pro tip: If text appears distorted, add “crisp, sharp, professional text rendering, perfect legibility.”
Real prompt example:
After generation, refine with follow-up prompts:
- “Make the title larger and more playful.”
- “Add more space between the blocks.”
- “Make the animals fluffier.”
- “Add visible stitching to the pillow blocks.”
- “Brighten the background slightly.”
The Difference Between AI Slop and Professional Results
Here’s what happens when you don’t follow a methodology:
❌ Lazy prompt: “Create an infographic about email marketing best practices.”
Result: Generic clipart, random colors, cluttered layout, inconsistent typography. Classic AI slop that you’d never actually share.
✅ Structured prompt: Detailed context, style guide, technical parameters, and specific composition instructions.
Result: A clean, branded infographic that looks like it came from a professional designer.
The difference isn’t talent; it’s structure. Same AI, same model, completely different outputs. Everything below teaches you how to get the professional result every time.
Tip: In the Gemini app, select Nano Banana Pro when you need the most control over layout and text. Google lists Nano Banana Pro features for paid plans (Google AI Plus, Pro, and Ultra); free accounts use Google’s faster Nano Banana models.
From Theory to Practice: Real-World Prompt Breakdown
The principles are clear, but how do they translate into actual work? Let’s look at five real prompts that show how the 6-step methodology turns abstract theory into professional, repeatable results.
Use Case 1: Child Psychology & Parenting Content
Scenario: Creating a warm, emotionally safe infographic about feelings for children (5–10) and their parents, needed for both blog articles (horizontal).
Prompt: Download
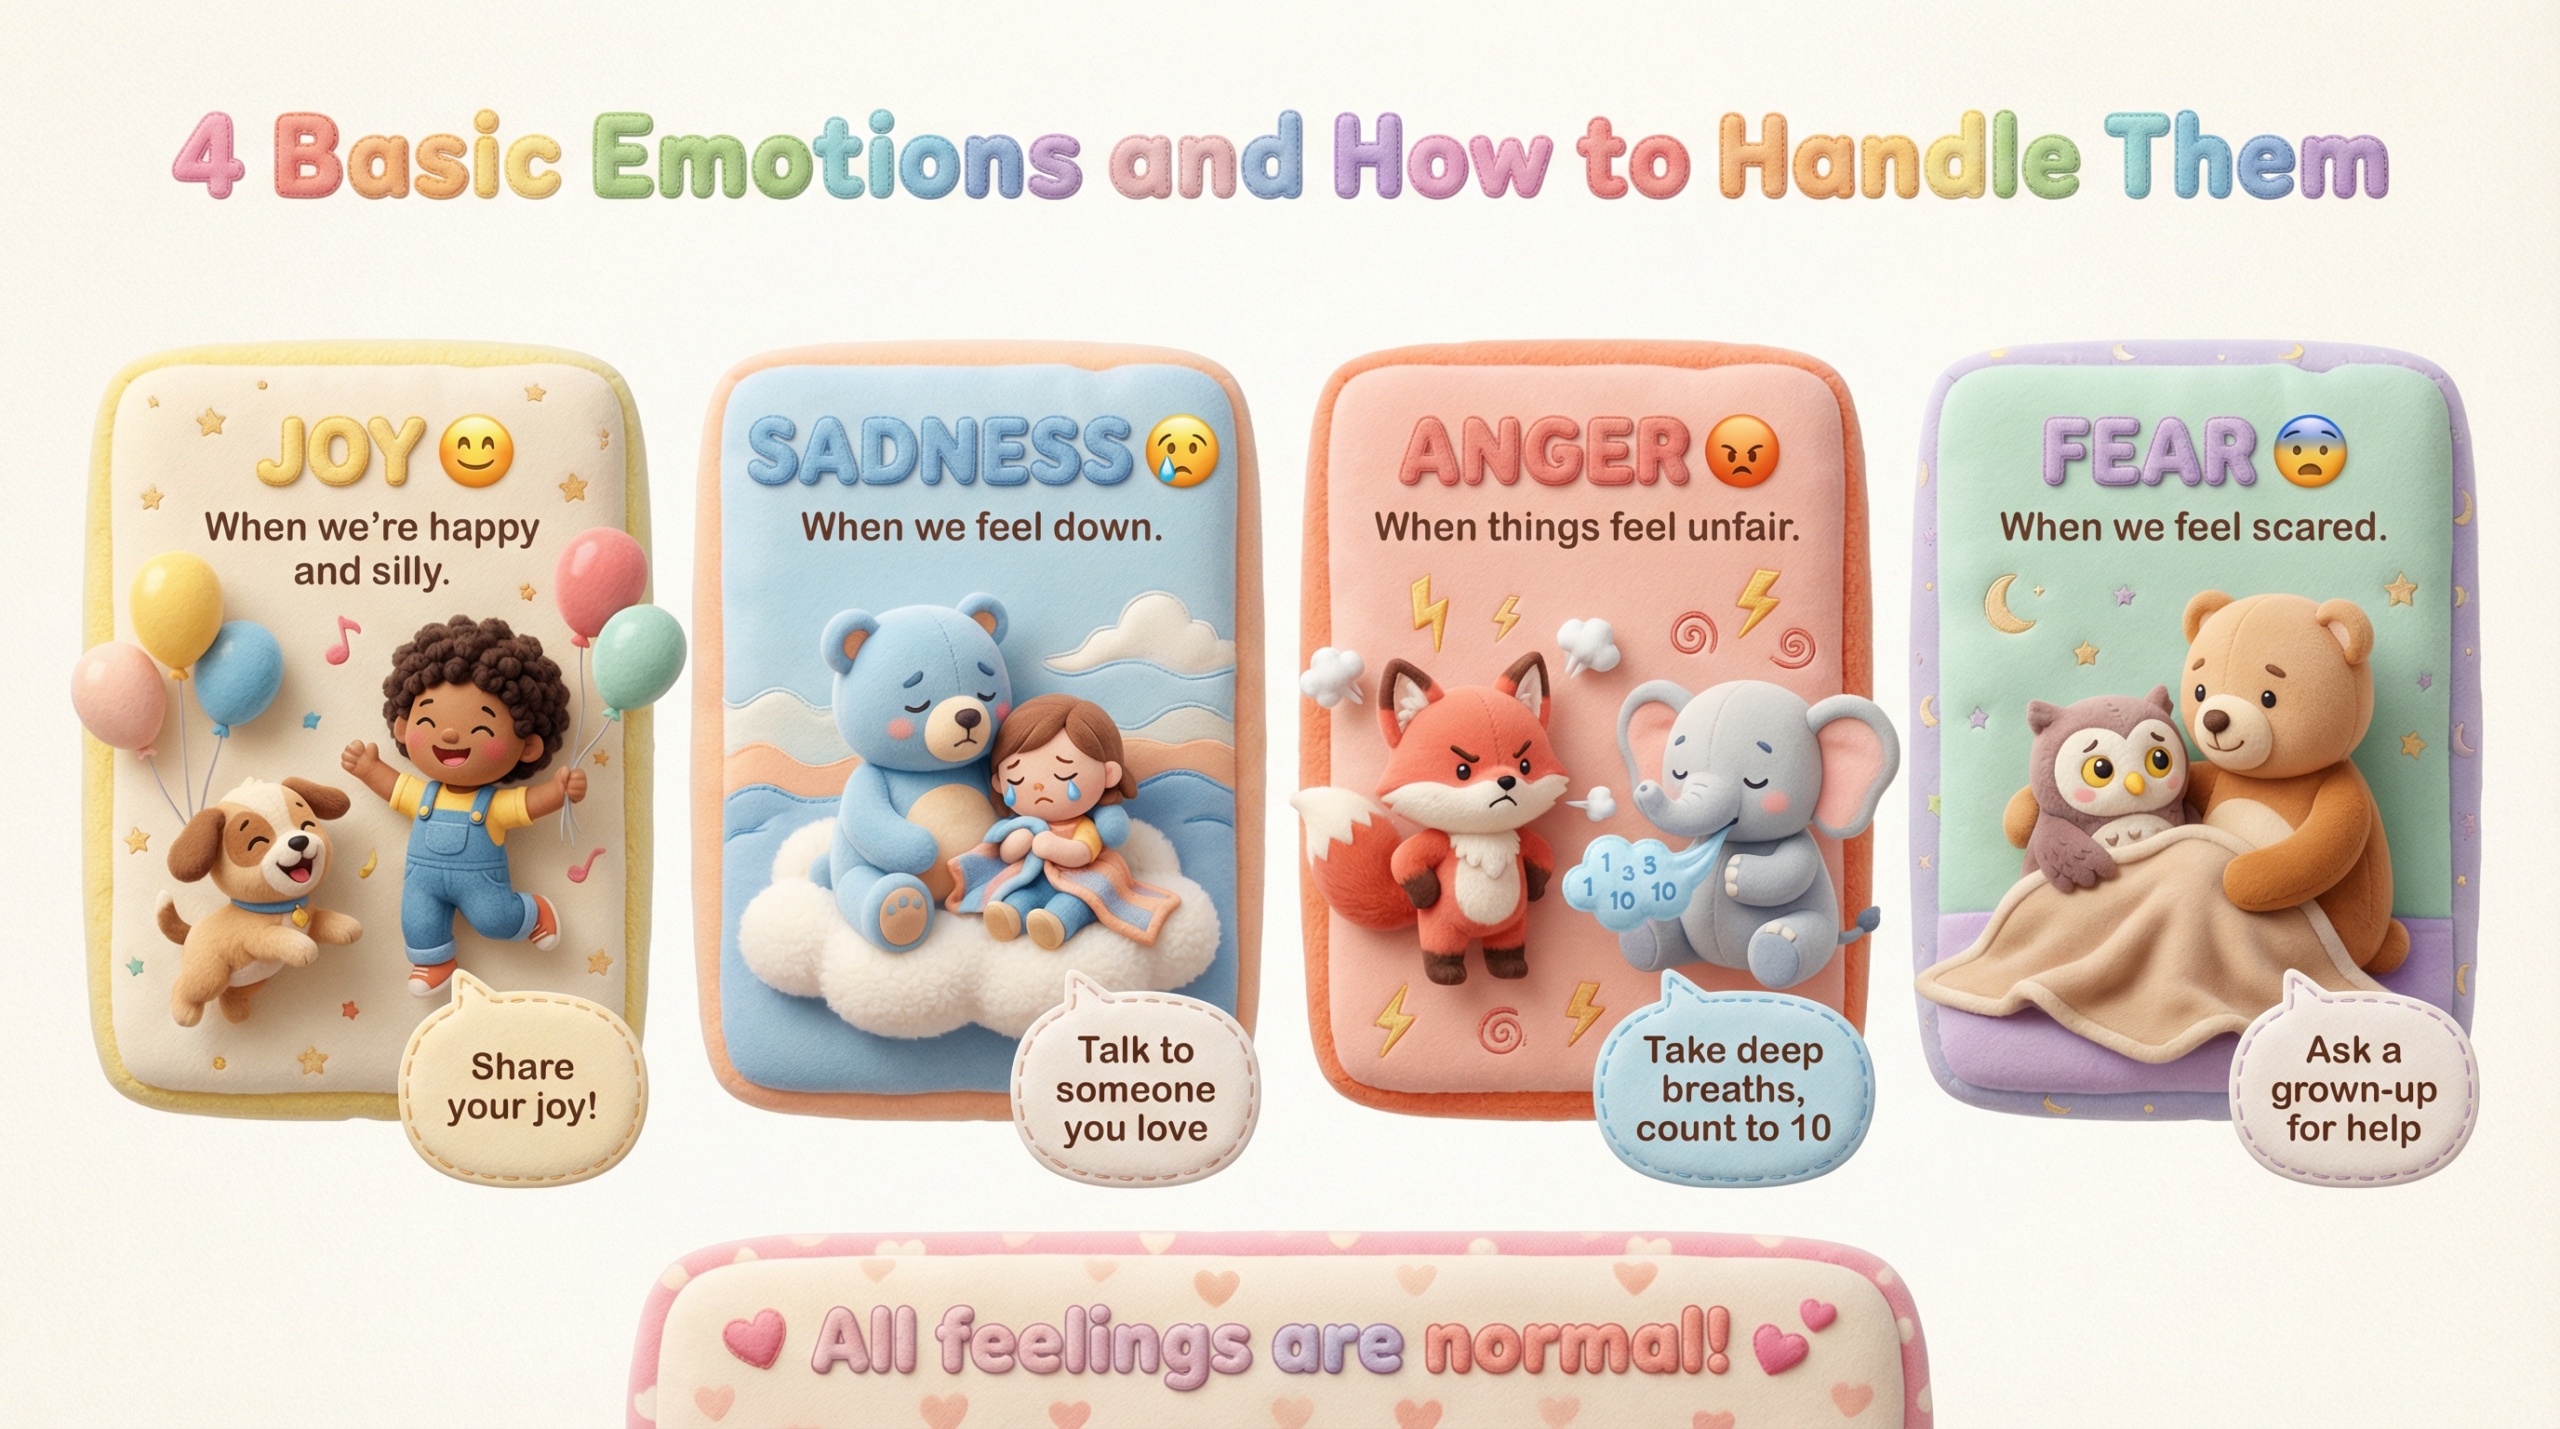
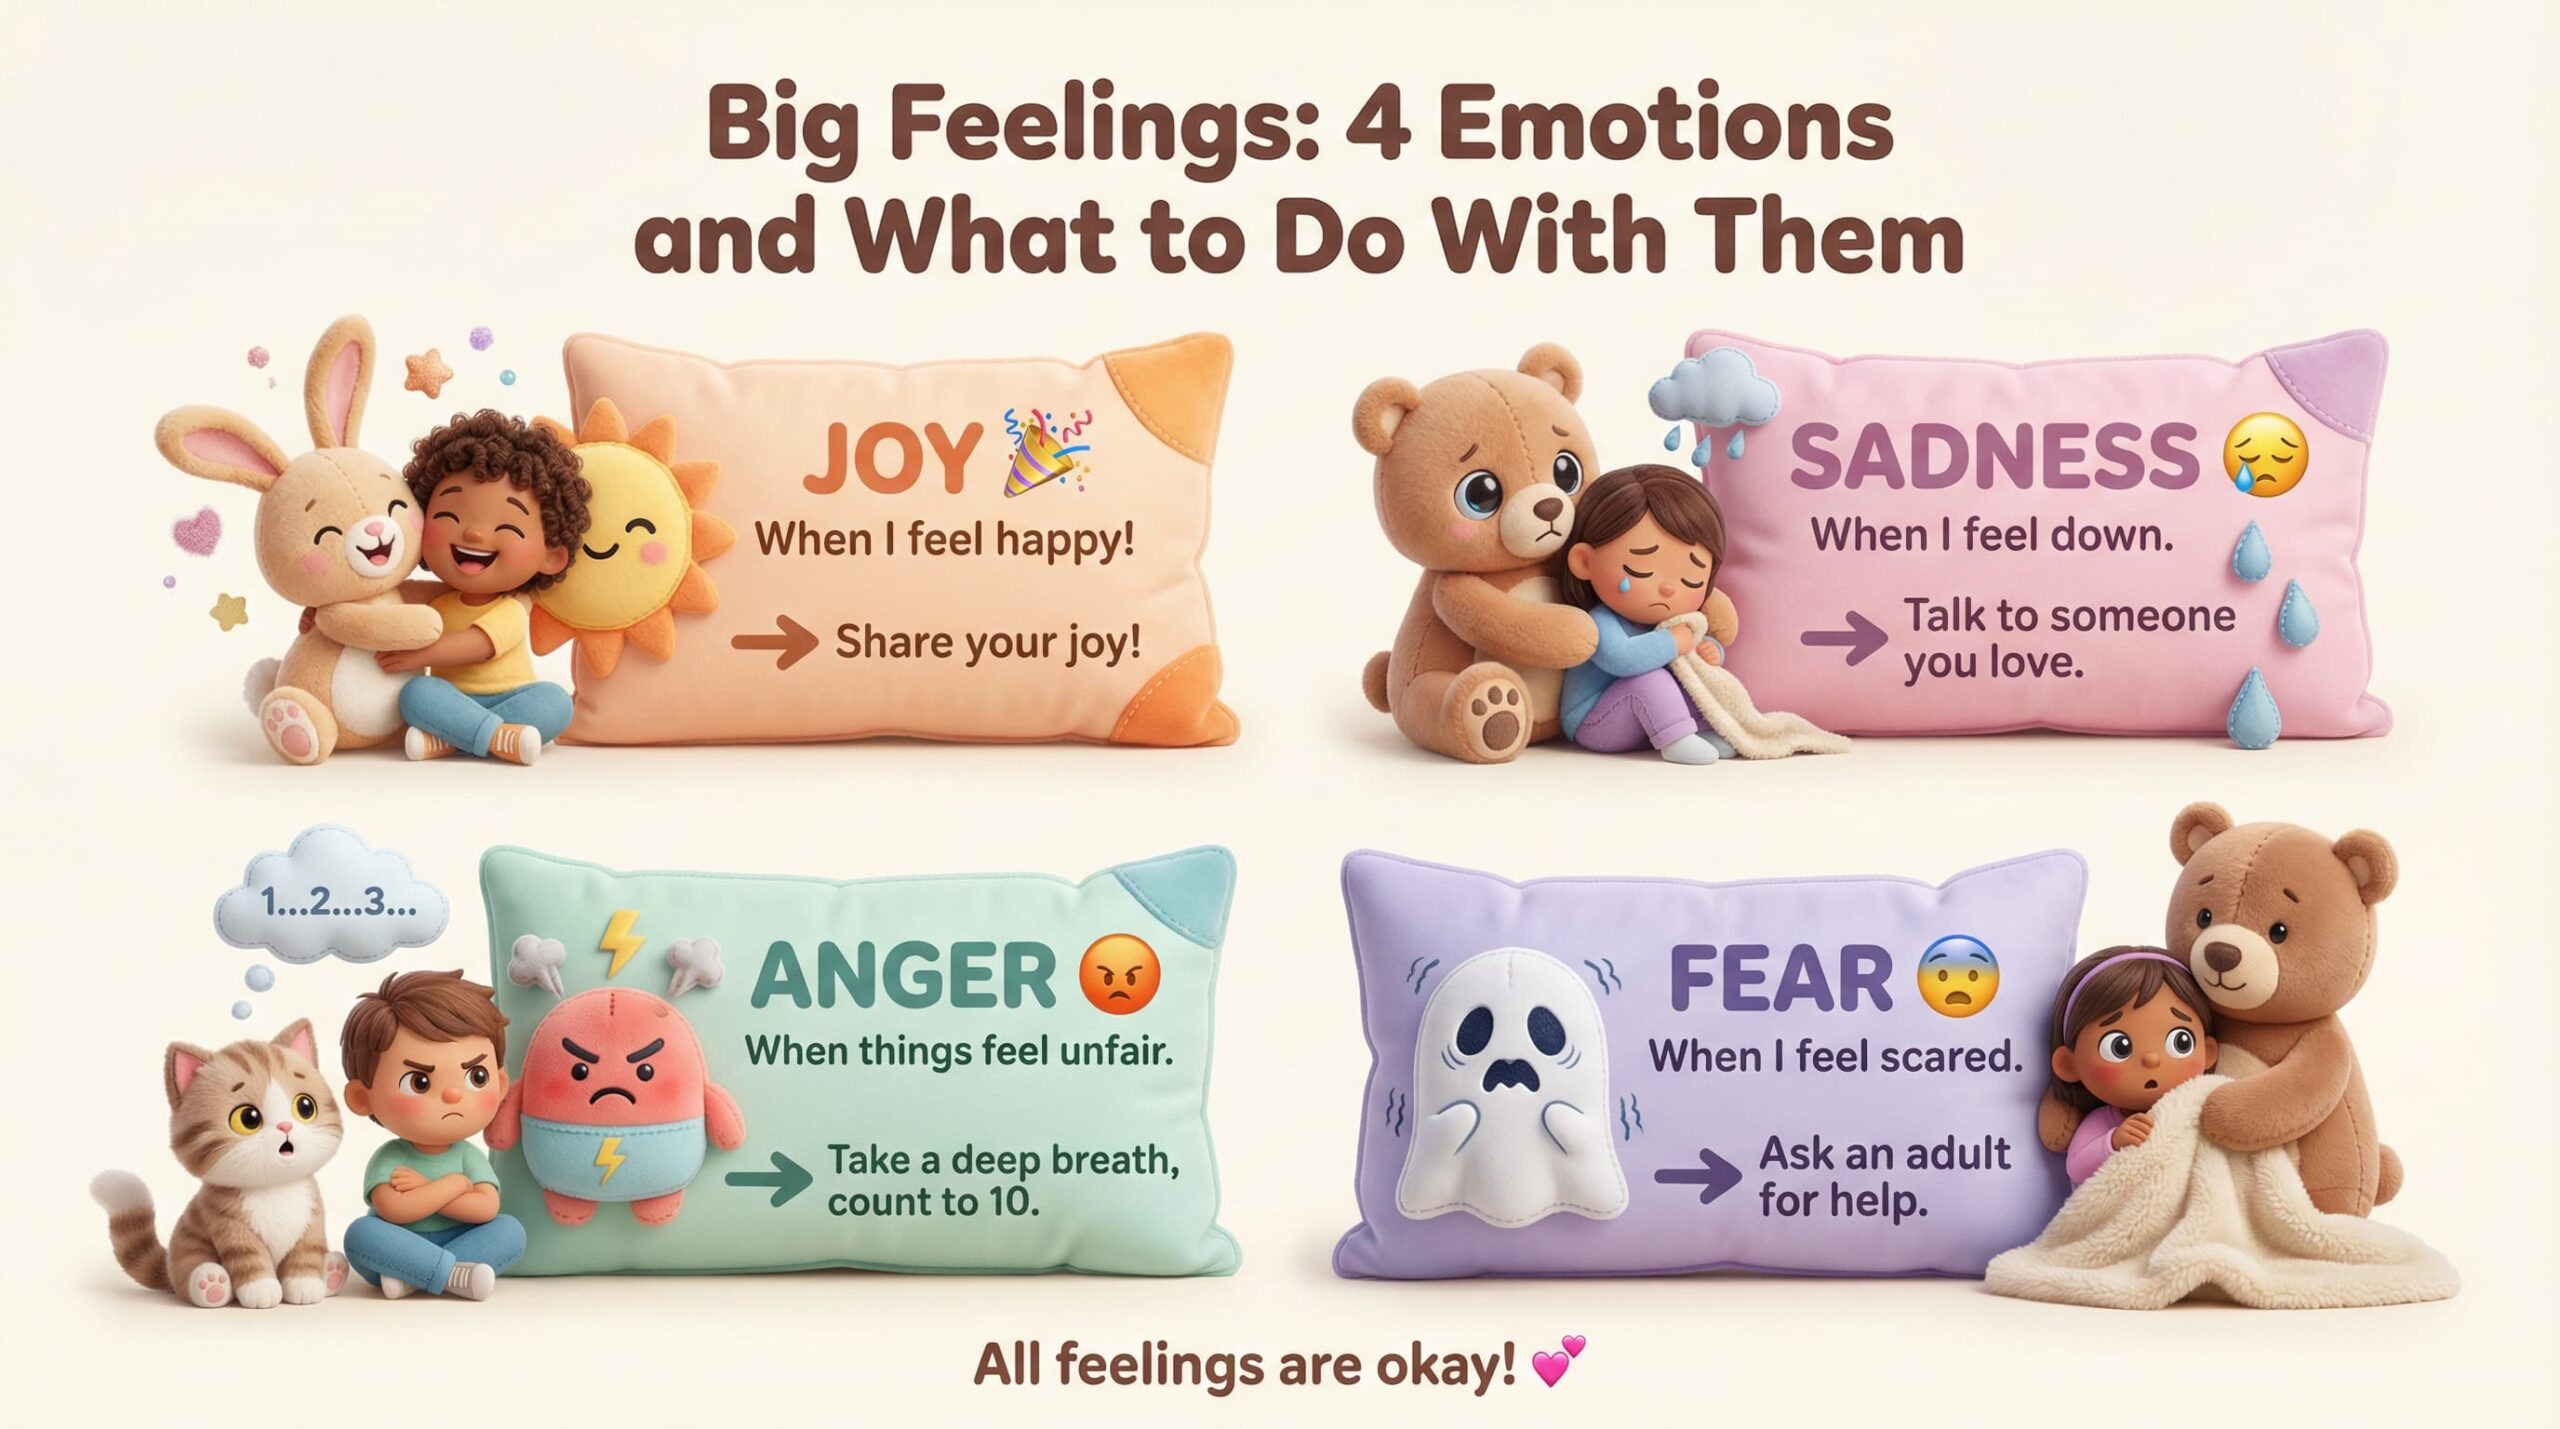
✅ Why it works: This structure preserves context, tone, and visual identity while adapting for different platforms. You don’t rewrite prompts; you reuse one master version and adjust only the layout and format.
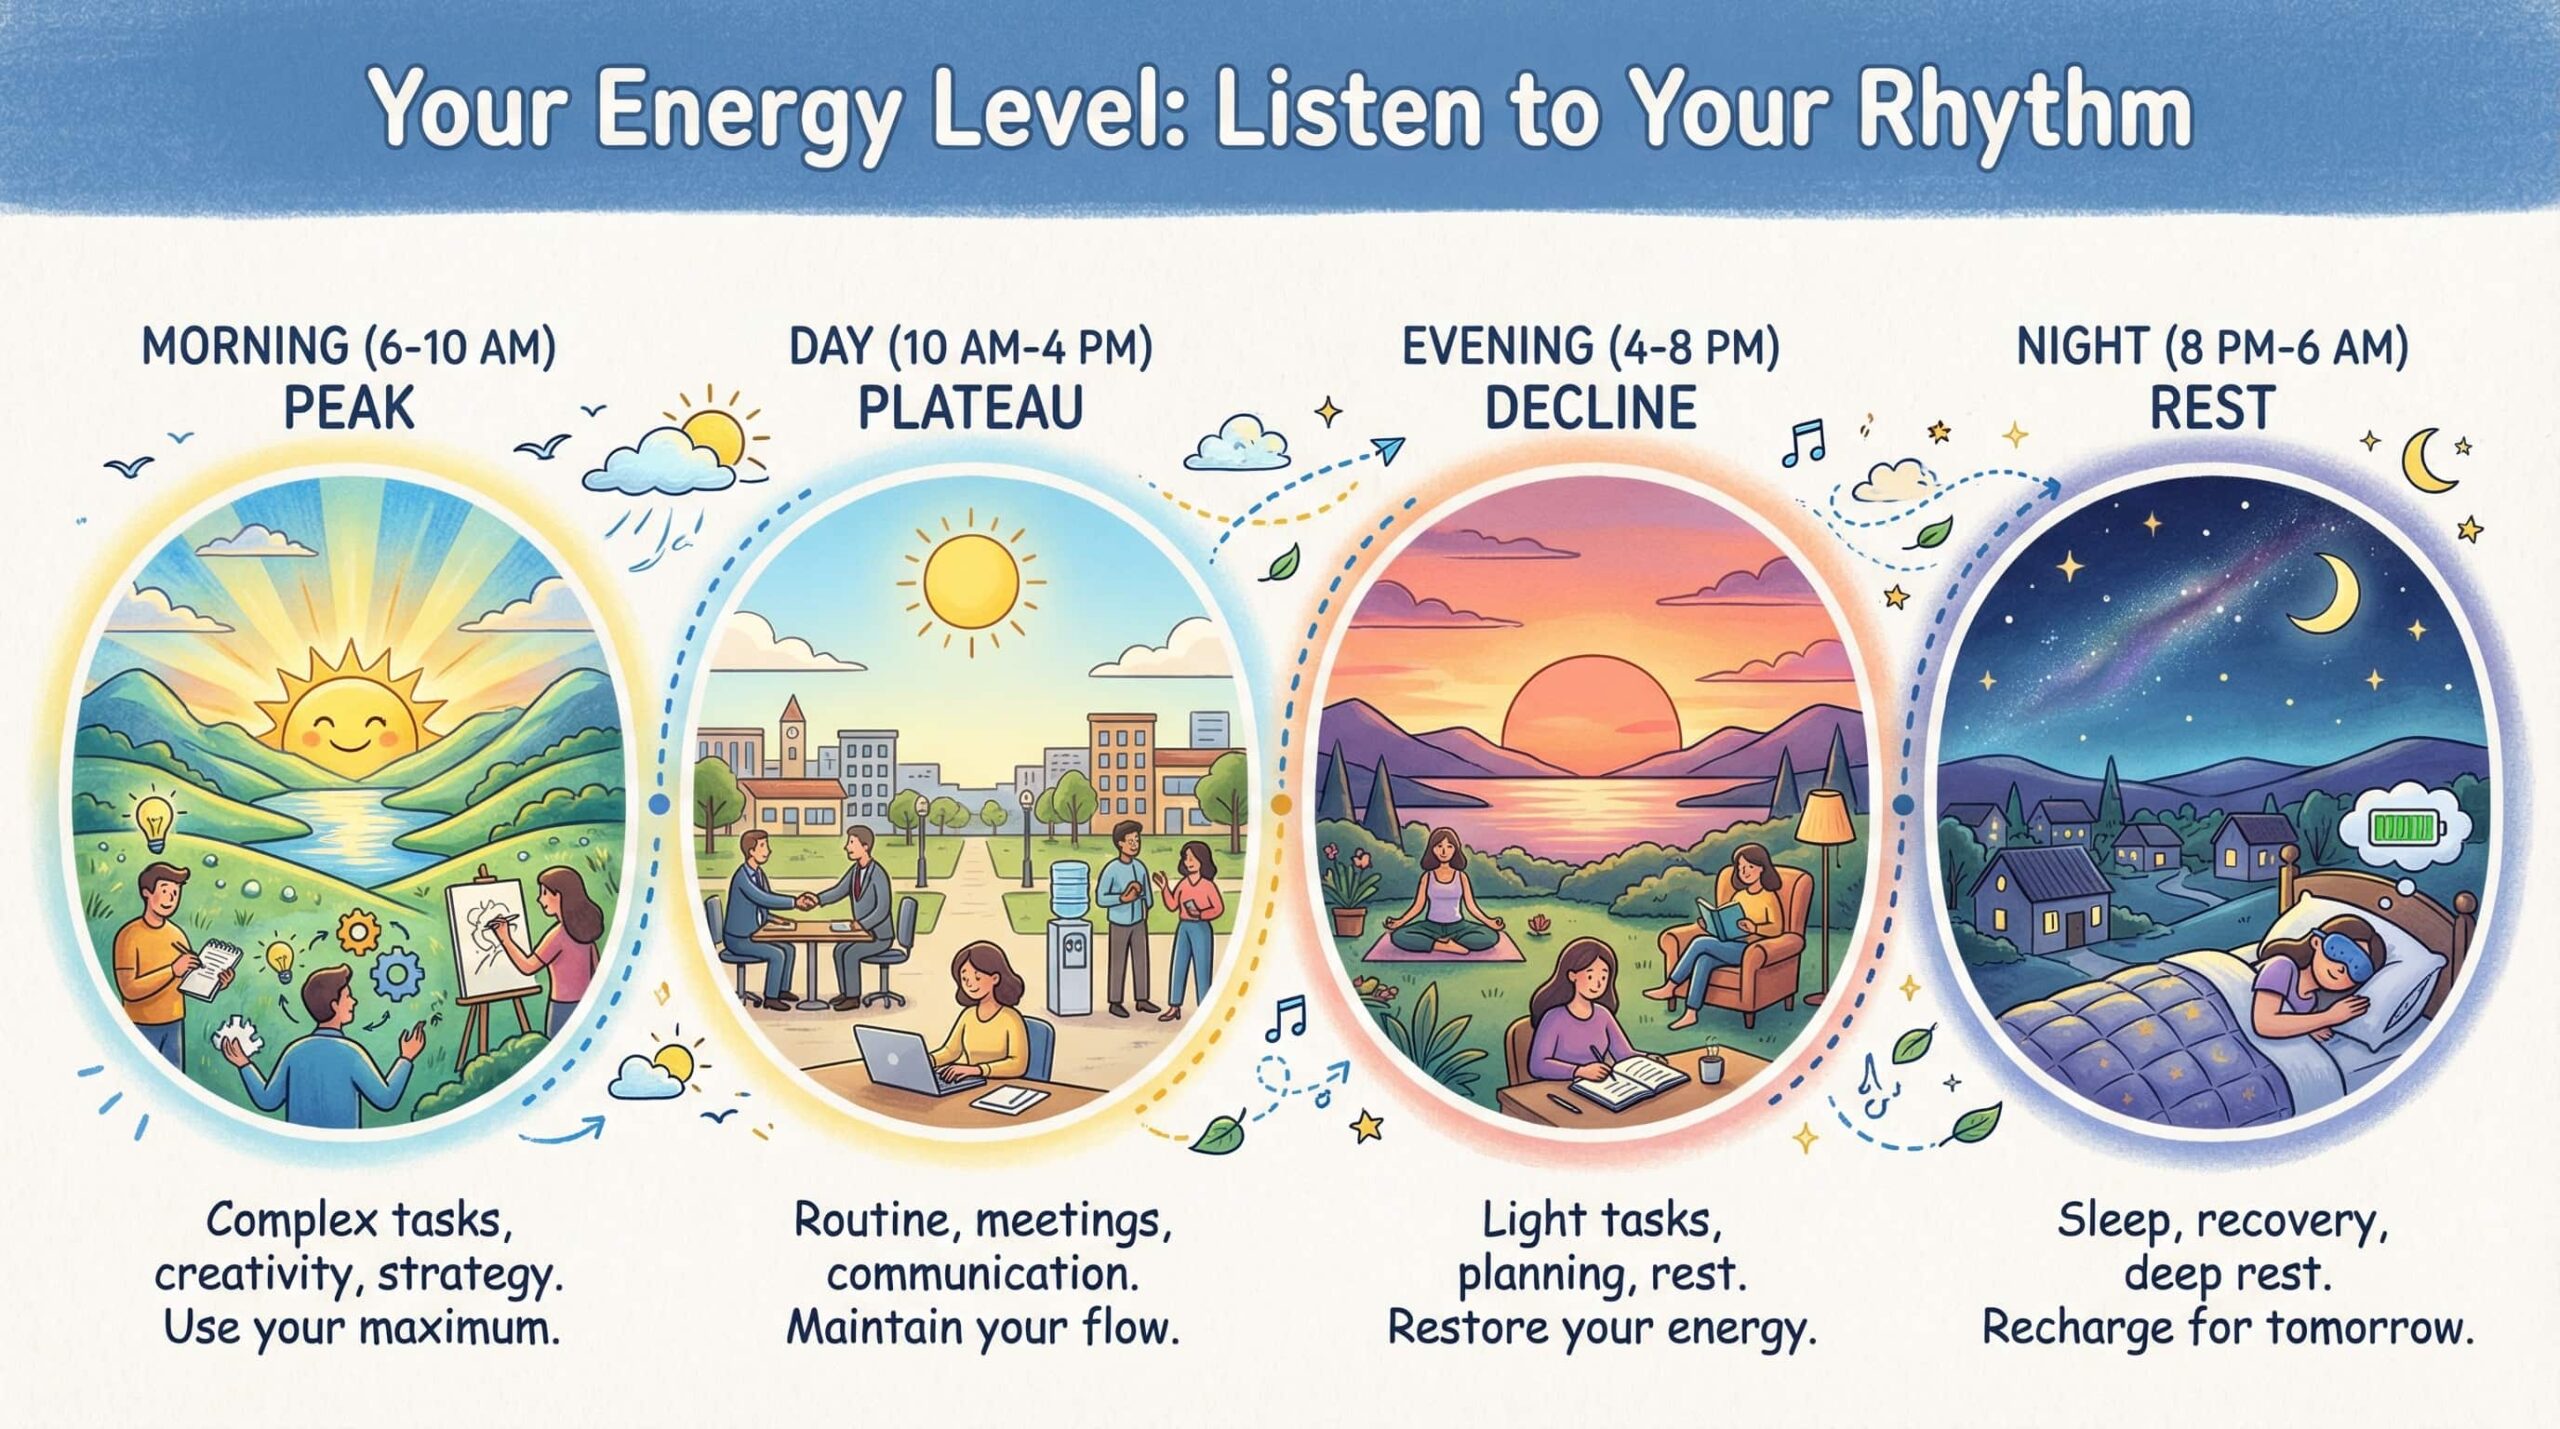
Use Case 2: Productivity Blog for Professionals
Scenario: A warm, hand-drawn infographic for a blog about daily energy cycles, helping freelancers and young professionals plan tasks without burnout.
Prompt: Download
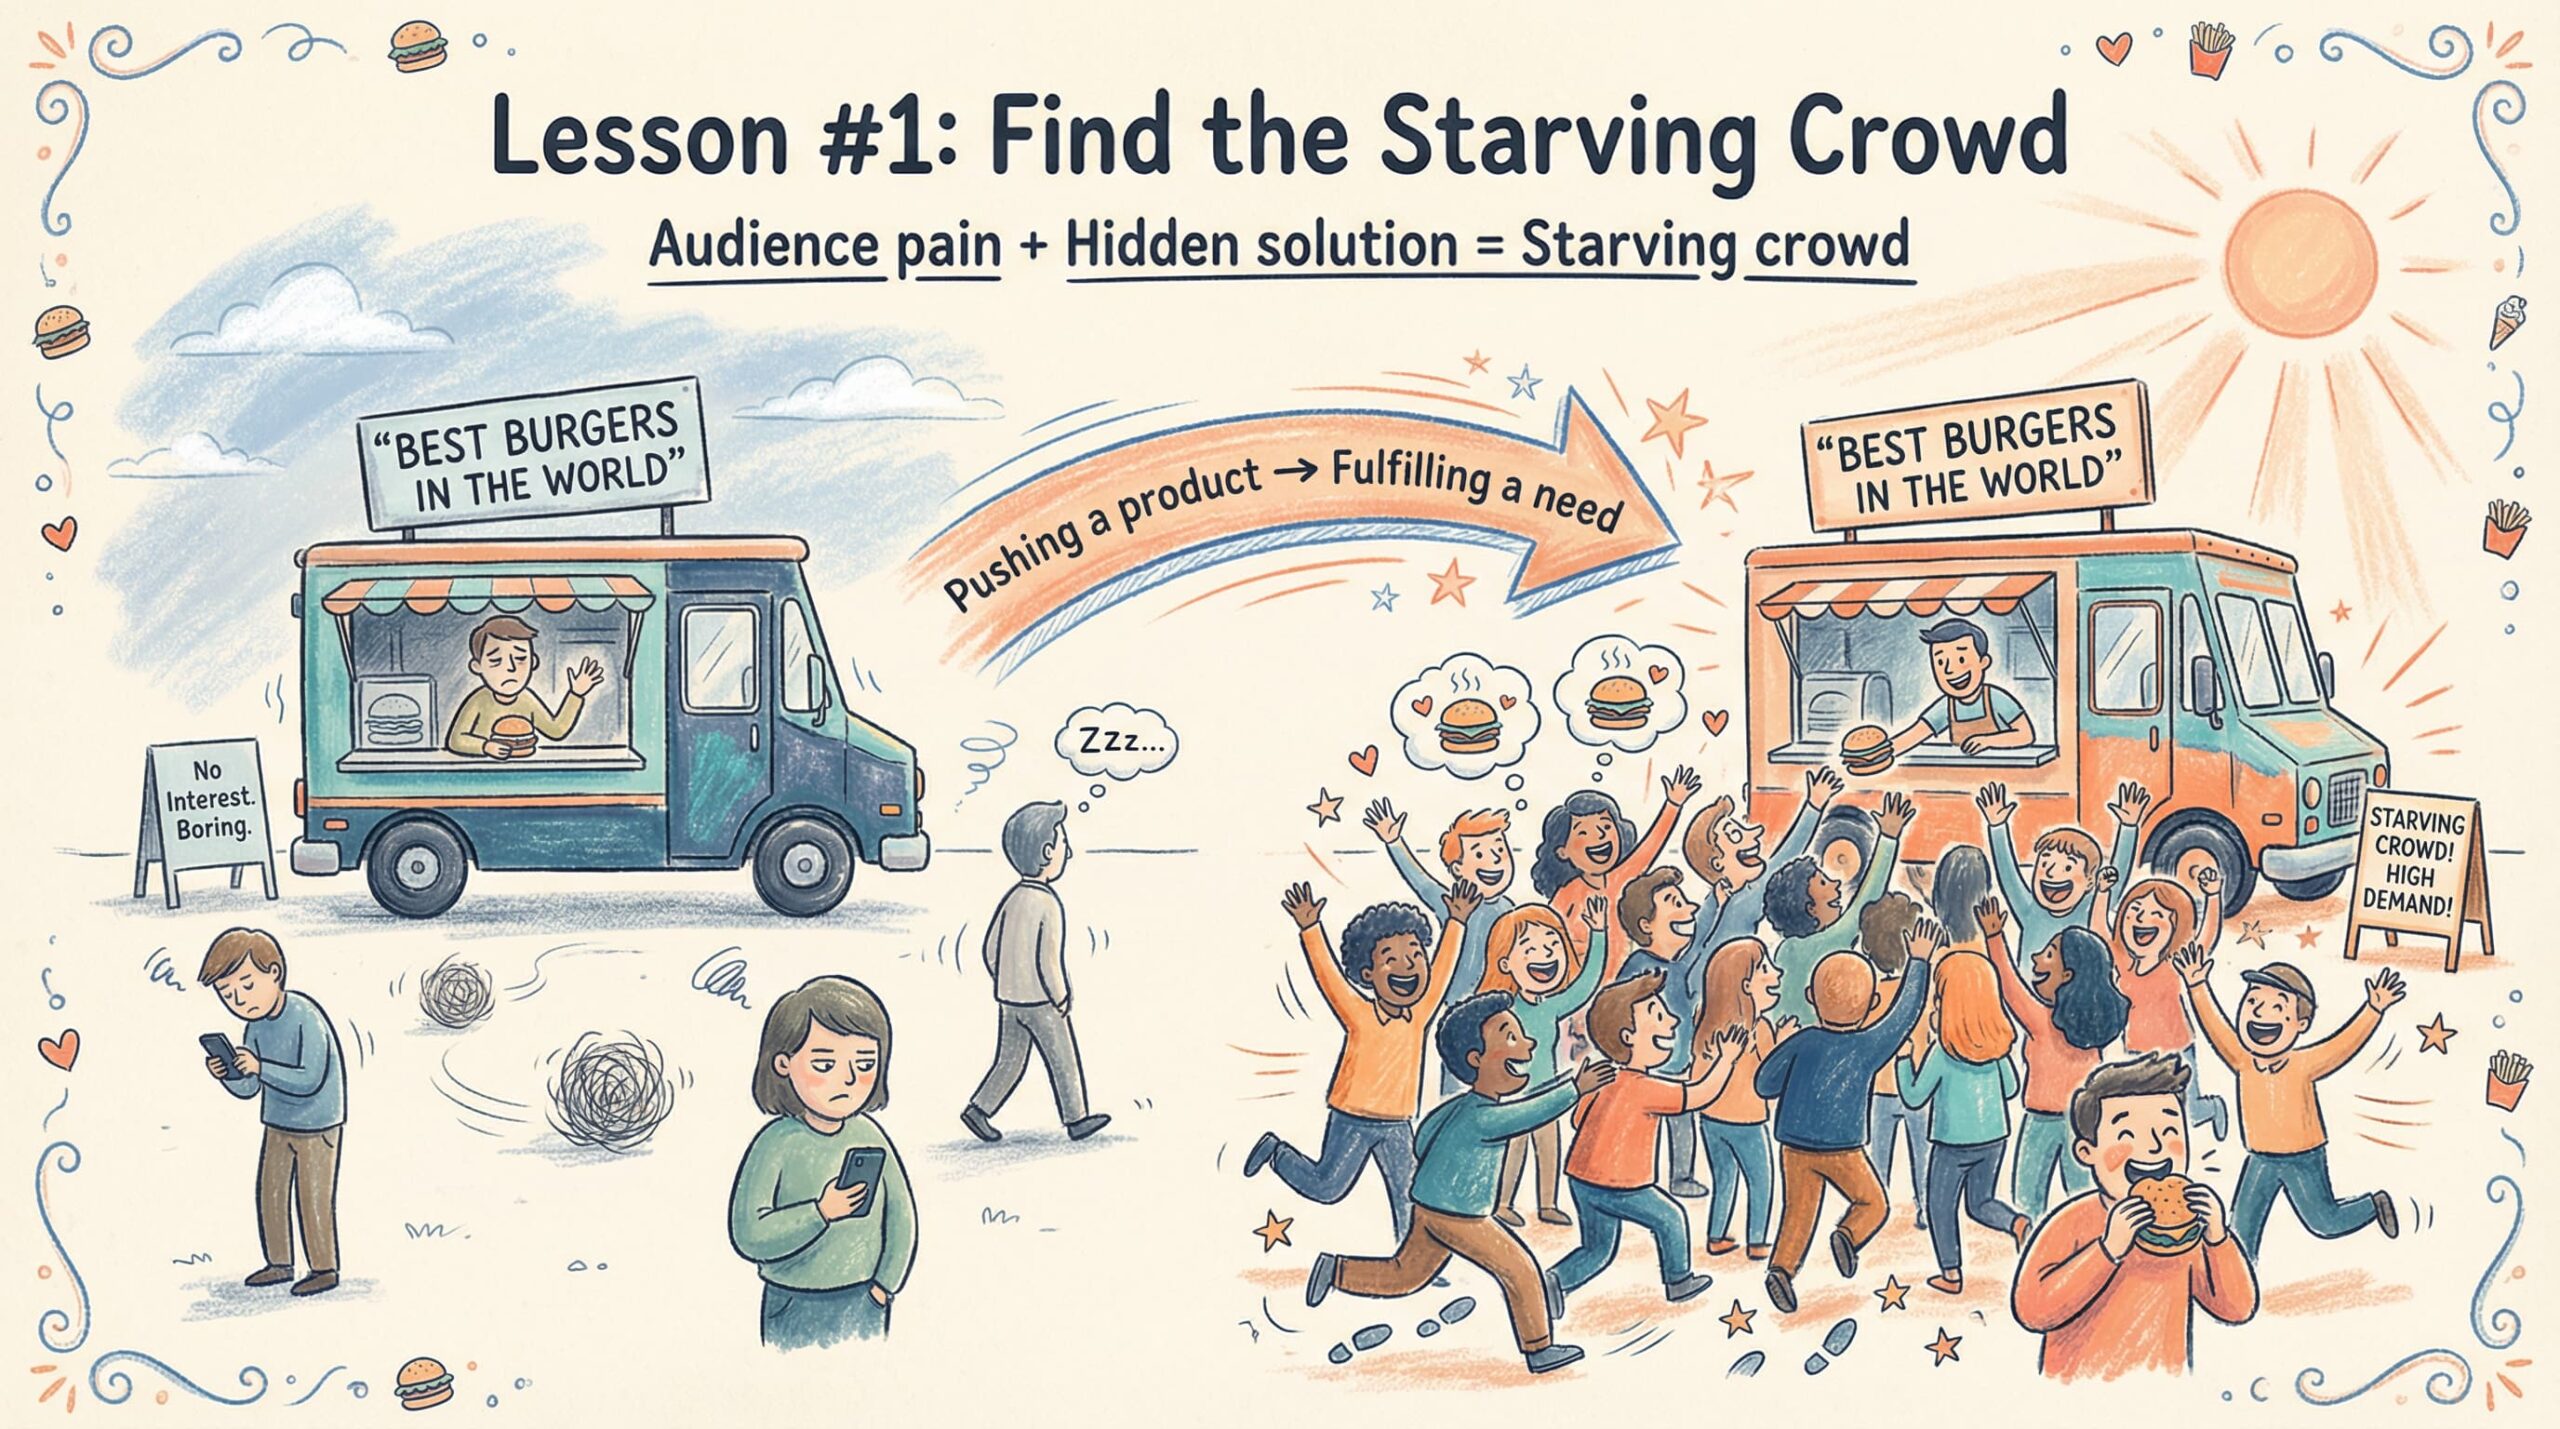
Scenario: A warm, hand-drawn infographic for a marketing blog explaining Gary Halbert’s “Starving Crowd” principle, helping marketers identify audience pain and position offers as urgent, hidden solutions that turn indifference into high demand. Prompt: Download
Scenario: An enticing, hand-drawn infographic that offers marketers a straightforward tour of the “AI Tools Railway.” Every stop, piece of writing, research, visuals, video, and email reveals a new creative ability. This trip helps marketers select the best tools to confidently and joyfully plan, design, create, and launch their campaigns while also making the AI world seem less daunting.
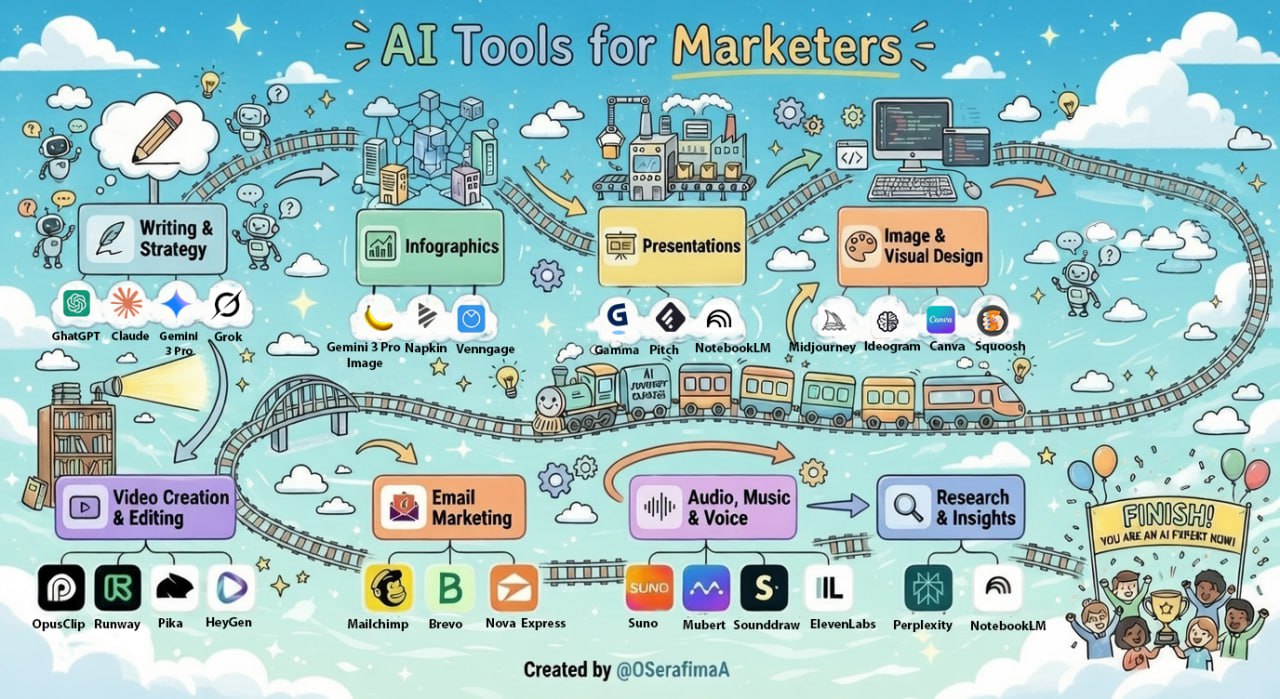
✅ Why it works: Every element follows the 6-step structure: context, subject, composition, style, technical specs, and iteration. This ensures emotional warmth, visual consistency, and clarity, the exact opposite of “AI slop.”
Use Case 3: Photo Restoration & Colorization
Scenario: Restoring a damaged vintage family photo, removing scratches, cracks, and defects, then colorizing with natural tones while preserving the original character. This use case demonstrates Nano Banana Pro’s powerful image editing capabilities: not just generation but also intelligent restoration and enhancement.
Prompt: Download
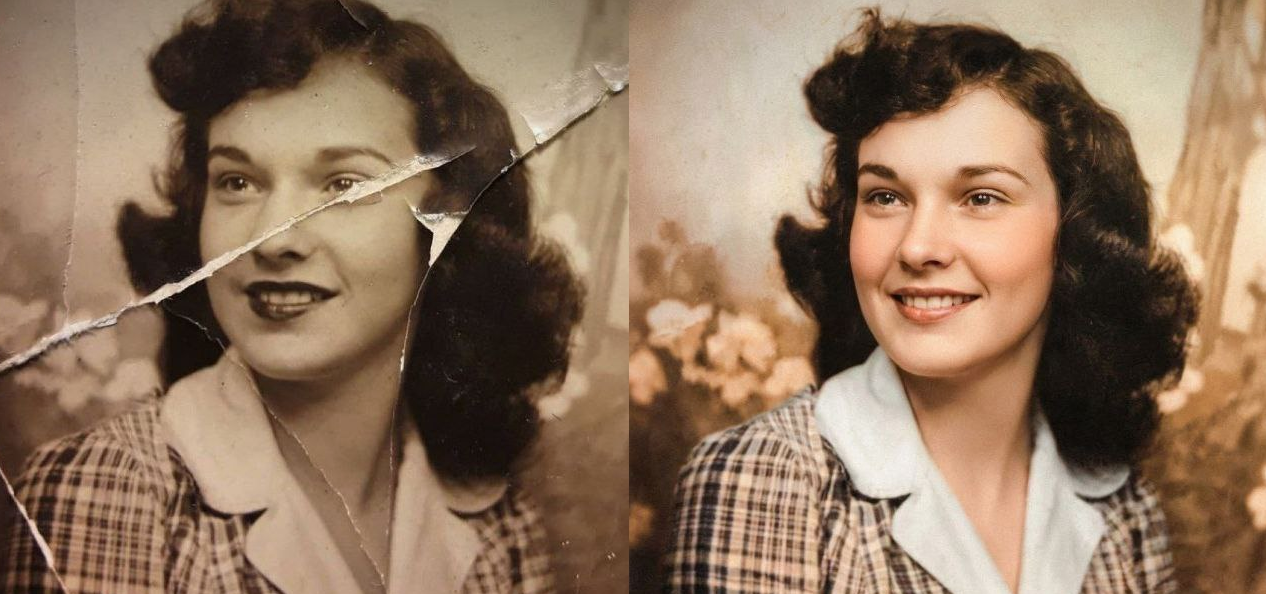
Why it works: The prompt follows the 6-step methodology by being specific about:
- What to fix: scratches, dust, stains, artifacts (clear task)
- What to preserve: texture and facial features (constraints)
- Style direction: warm pastel tones, film grain (aesthetic guidance)
- Composition: background blur for subject emphasis (technical parameter)
Iteration Examples:
- “Make the colorization warmer.”
- “Reduce film grain intensity.”
- “Sharpen facial features slightly.”
- “Make the background more blurred.”
- “Adjust skin tones to be more natural.”
Use Case 4: Fashion Lookbook / Character Consistency Collage
Scenario: Creating a professional fashion lookbook with consistent character across multiple poses for e-commerce, portfolios, or advertising campaigns. This showcases Nano Banana Pro’s character consistency feature, maintaining the same face across 9 different poses and angles.
Prompt: Download
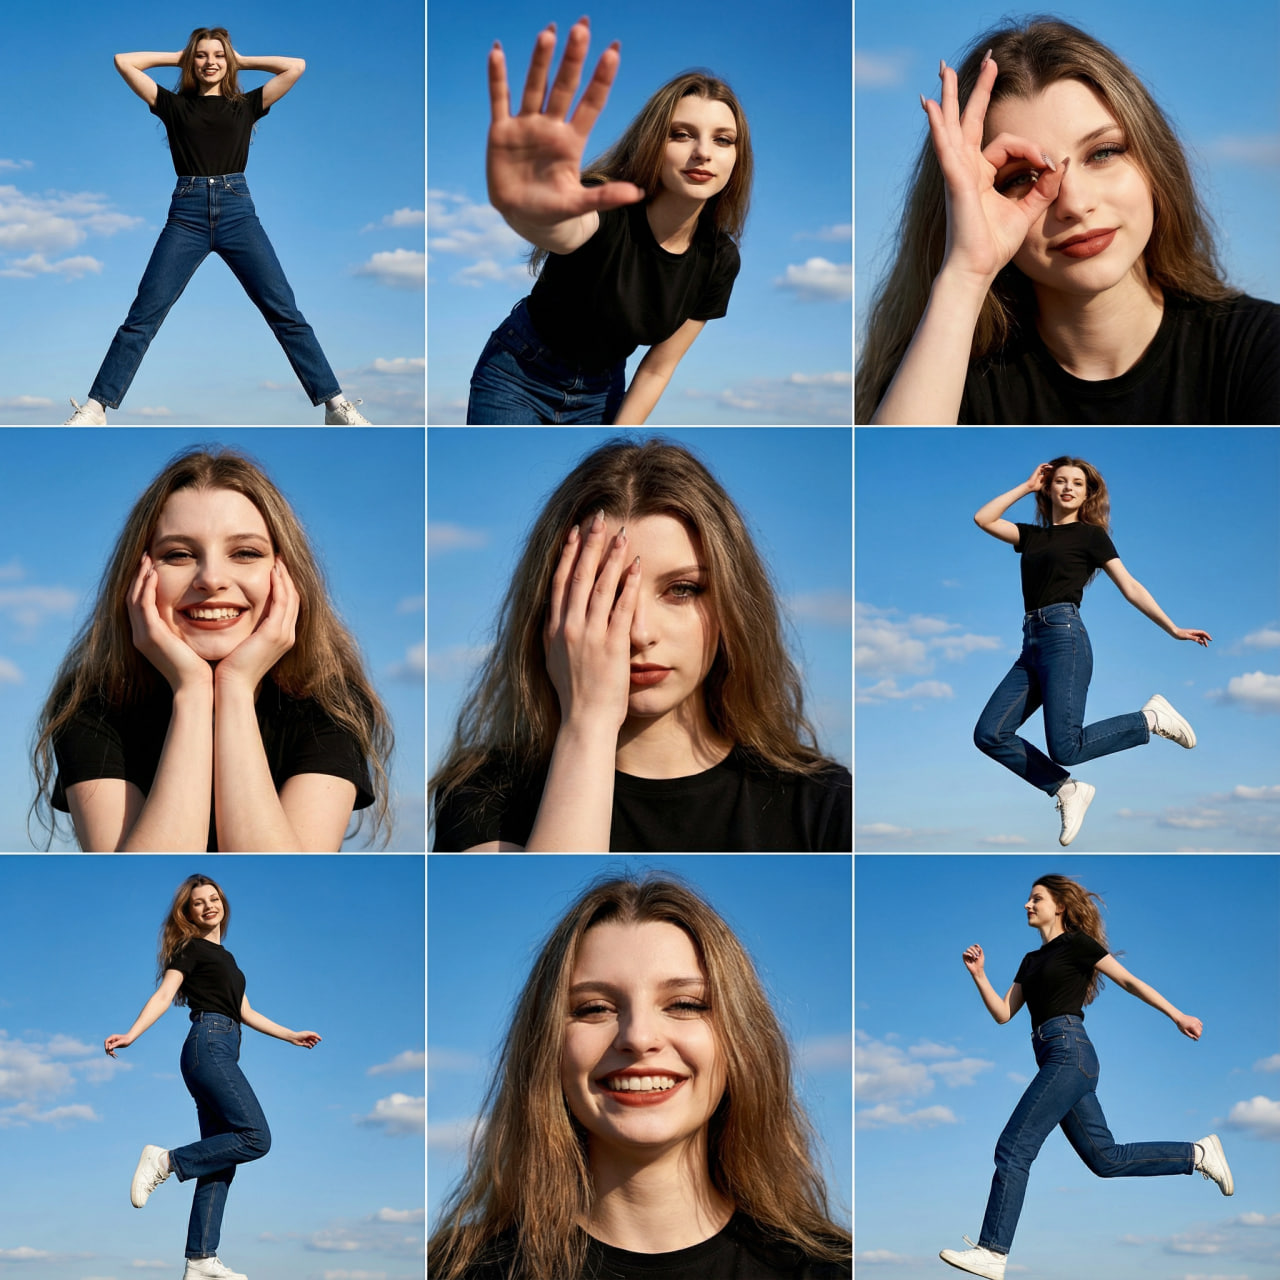
✅ Why it works:
Reference-based generation: uploaded face ensures character consistency
Structured sections: setting, wardrobe, cinematography, poses, quality, and aesthetic
Specific pose descriptions: each of the 9 poses is clearly defined
Technical parameters: focal lengths, lighting, and resolution are explicitly stated
Commercial aesthetic: targets professional lookbook quality
Adaptation Tips:
For E-commerce Product Shots:
Change the WARDROBE section to your product
Change POSES to product-relevant angles
Add: “Clean product photography style, white or neutral background.”
For Social Media Content:
Change to 1:1 or 9:16 format
Reduce to 4 poses (2×2 grid)
Add: “Instagram-ready, vibrant colors, engaging expressions.”
For Portfolio/Headshots:
Focus on portrait close-ups only
Change to 2×2 or single image
Add: “Professional headshot lighting, neutral background.”
Iteration Examples:
- “Make the poses more dynamic.”
- “Change outfit to [new description].”
- “Make lighting softer/harder.”
- “Add more variety in facial expressions.”
- “Change background to an urban setting”
Use Case 5: Before/After Transformation
Scenario: Creating realistic before/after comparisons for renovations, makeovers, or transformations is essential for interior design, real estate, and home improvement content.
Prompt: Download
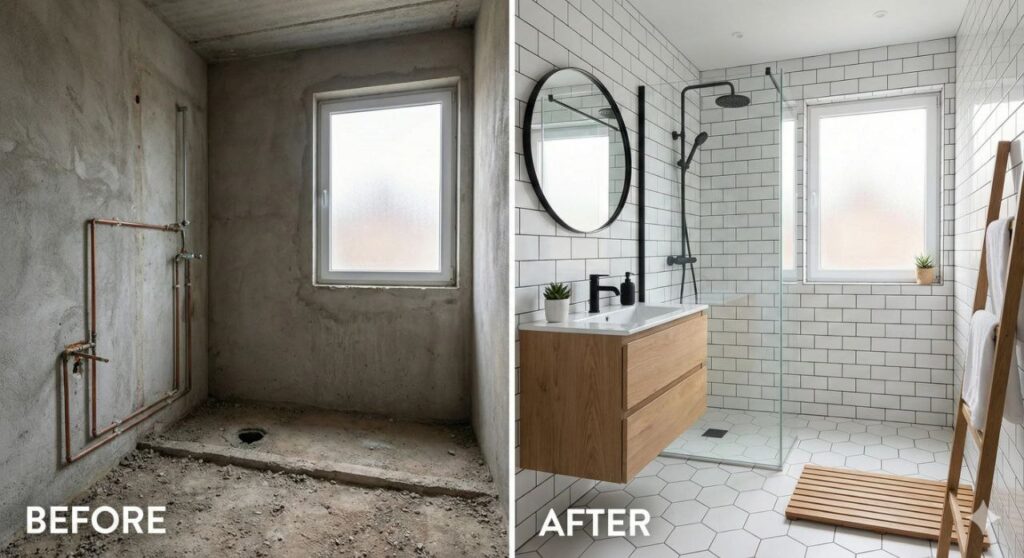
✅ Why it works:
Clear structure: split-screen format explicitly requested
Specific “before” state: raw concrete, exposed pipes
Detailed “after” vision: specific style (Scandinavian), materials (subway tiles, hexagonal floor), fixtures
Consistency directive: same angle and the same layout ensure believability
Variations:
For Interior Design: Before/after living room transformation.
Before: empty room with white walls.
After: mid-century modern with a velvet sofa, brass accents, and large plants. Same perspective, photorealistic.
For Landscaping:
Split-screen Garden makeover. LEFT: an overgrown backyard with weeds. RIGHT: Japanese Zen garden with gravel paths, bonsai, and stone lanterns. Same camera angle.
Quick Transformation Prompts
These one-liner prompts demonstrate Nano Banana Pro’s ability to understand context and make intelligent transformations with minimal instruction. Beyond full image builds, Nano Banana Pro shines at quick edits and transformations. Here are some one-liner prompts that work surprisingly well:
Simple Object Replacement
✅ Instantly swap one element for another ✅ Perfect for quick mockups
Make this living room into a cozy cabin with a fireplace.
Mood & Setting Changes
✅ Set the scene or mood with one line ✅ Simple transformations that just work
Turn this photo of my dog into a fluffy sheepdog.
Composition Creation
✅ Combine subject + background + props ✅ Professional marketing visuals in seconds
Reimagine the Ferrari driving down the desert highway at sunset. Cinematic lighting and dramatic shadows.
Camera & Lighting Control
✅ Control lighting and feel with keywords ✅ Studio-quality product shots
The bottle of perfume is on a silk cloth, with soft focus and a dreamy, elegant feel. Macro shot.
Cinematic Framing
✅ Frame the shot like a cinematographer ✅ Precise control over perspective
A low-angle shot of a new athletic shoe. The shoe is on a running track, with the camera close to the ground, emphasizing motion and power. Sharp focus on the shoe, with a blurred background.
Identity-Preserving Transformation (Video)
✅ Transform while maintaining identity ✅ Perfect for before/after content
Use the two images to create a video that seamlessly transforms the character’s hairstyle, maintaining all other visual details to show brand consistency.
Key Takeaway
You don’t need to write new prompts from scratch. Build a single master prompt that includes all six structured elements. Then, adapt it with small tweaks (layout, ratio, platform), keeping brand voice, tone, and design logic intact.
That’s what turns prompting into a creative process, not a guessing game.
How to Use Nano Banana Pro
Quick comparison of the three most popular options:
| Feature | Gemini App | Google Workspace | API / AI Studio |
|---|---|---|---|
| Price | Paid AI plans * | Subscription | ~$0.134-$0.24/image |
| Iteration | ✅ Conversational | ✅ Style selection | ✅ Full control |
| Watermark | Small | Small | None |
| Resolution | Depends on plan | Up to 4K | Up to 4K |
| Best for | Testing, individual use | Teams, presentations | Developers, pros |
*Google no longer publishes fixed daily image counts. Limits scale by plan (Google AI Plus 2x, Google AI Pro 4x the standard limit) and may change.
Recommendation: The free Gemini app is great for testing prompts with the faster Nano Banana models. For serious work with Nano Banana Pro, consider a Google AI Pro plan, which Google lists at 4x the standard Gemini limits, or use NotebookLM for document-to-visual workflows.
Method 1: Everyday Users (Gemini App)
For: individual creators and marketers on a Google AI plan
Steps:
- Open the Gemini app on your phone or gemini.google.com in a browser.
- Go to Create → Image generation.
- Select the Nano Banana Pro model or thinking mode.
- Enter a detailed prompt.
- Refine through follow-up instructions.
- Download the image.
Advantages: Simple, allows conversational iteration, and is the most powerful iterative experience for image generation
Limitations: Nano Banana Pro requires a paid Google AI plan; free accounts use Google’s faster Nano Banana models. Limits depend on your plan and may change. Small Gemini watermark at bottom right. For higher volume, Google AI Pro raises your limits to 4x the standard level, and Google AI Ultra goes higher.
Method 2: Professionals & Teams (Google Workspace)
For: marketers, educators, teams
In Google Slides:
- Insert → Image → AI Image (or “Help me visualize”).
- Enter a prompt or choose “Beautify this slide.”
- Nano Banana Pro activates automatically.
- Insert and refine through follow-up prompts.
- Save to presentation.
Method 3: Developers & High-Volume Users (API / AI Studio)
For: developers, agencies, teams running large-scale campaigns, automated workflows
In Google AI Studio / Vertex AI (API access):
- Go to ai.google.dev or console.cloud.google.com/vertex-ai.
- Create a new project or open an existing one in AI Studio.
- Select the Gemini 3 Pro image (Nano Banana Pro) model.
- Use the API playground or integrate via code (REST, Python SDK, etc.).
- Send structured prompts with parameters (aspect ratio, reference images, temperature, etc.).
- Receive image(s); refine iteratively via conversation ID or batch requests; download or save to storage.
Advantages: Full control, up to 4K, no daily limits, no watermarks, batch generation, perfect for automation and A/B testing.
Limitations: Requires an API key and billing setup; pay-per-use (about $0.134 per 1K or 2K image and $0.24 per 4K image).
In NotebookLM:
NotebookLM uses Nano Banana Pro for several powerful features. Learn more about NotebookLM for marketers for detailed workflows.
- Slide Decks: Instantly convert documents into fully styled presentations.
- Infographics: Visualize key insights from your sources as professional infographics.
- Video Overviews: Generate narrated videos with 7 visual styles: Watercolor, Papercraft, Anime, Whiteboard, Retro Print, Heritage, or Auto-select.
How to use:
- Upload your sources (PDFs, documents, web pages).
- Select “Create” → choose Slide Deck, Infographic, or Video Overview.
- Pick a visual style.
- Export as PDF or to Google Slides.
Advantages: Transforms dense documents into visual content, available globally for subscribers.
⚠️ Limitation: You can choose styles but can’t iteratively refine individual images through conversation. For that level of control, use the Gemini app.
Conclusion: Build Your Stack, Save Your Time
AI tools don’t replace designers; they replace grunt work. A visual for an ad campaign that took 3 hours with a photographer and designer? Nano Banana Pro creates it in 15 minutes. A series of consistent images for a comic or presentation? Done in one conversation. An infographic with data? While you finish your coffee.
Nano Banana Pro is a full creative partner that:
- ✅ Understands context and preserves it between iterations
- ✅ Professionally renders text in 50+ languages
- ✅ Maintains character consistency
- ✅ Executes complex multi-step instructions
Start small. Pick one scenario from this guide that solves your biggest problem right now. Master that workflow for two weeks before moving to the next. The marketers winning with AI aren’t the ones with 12 different tools; they’re the ones who built a focused system that fits how they actually work.
The more structured your approach, the more impressive your results. And those saved hours will compound into a real competitive edge.
Get Started Now
- Open the Gemini app.
- Select Nano Banana Pro or Thinking Mode.
- Use a prompt template from this guide.
- Iterate and refine.
Nova Express Resources
- 7 Midjourney V7 Prompts for Marketing Ads
- NotebookLM for Marketers
- AI Tools for Marketers
- GPT Image 2 for Marketers: How to Finally Get Readable Text in AI Images
- NotebookLM Infographic: The Complete Guide to Turning Your Data Into Visual Stories
- Best AI Video Generators for Marketers in 2026
- What Is an AI Marketing Agent?
- What Are AI Tokens? A Marketer’s Guide to Context, Cost, and Limits
- AI Image Color Palette: How to Borrow One From Nature
- Gemini API: Pricing
- Gemini API: Deprecations
- Gemini Apps limits
About the author
Serafima Osovitny is a Marketing Manager at Nova Express, where she focuses on digital marketing, search visibility, content strategy, and marketing workflows. She writes practical guides that help marketing teams research their audiences, develop strategies, and put their plans into action.
Explore her work at serafima.digital and follow her on X: @OSerafimaA.








A review of Nano Banana Pro that finally speaks the language of marketing: real use cases, workflows, and Google Workspace integration. If you want to level up your visual content in 2026, this is a must-read.
This article is a real lifesaver for beginners in AI marketing; the clear 6-step methodology and ready-to-use templates helped me instantly create professional visuals without any headache.